DIGITAL PHOTOGRAPHY AND IMAGING - Project 1 (Week 1-5)

Bachelor of Mass Communication
Digital Photography and Imaging
Notes and Exercises
____________________________________________________________________________________________________________
Week 1 (13/04/20)
Due to COVID-19 pandemic, we are currently taking online classes via Zoom. Today, Mr. Martin gives us a brief description of the module and some examples of amazing Photoshop artworks.
 |
| Figure 1: Example of Photoshop Artwork. |
 |
| Figure 2: Example of Photoshop Artwork. |
He also gives us an explanation about Project 1 (practical exercises) and Project 2 (part b).
 |
| Figure 3: Project 1. |
 |
| Figure 4: Project 2. |
After that, Mr. Martin has assigned 2 tasks for us to be completed by this week, which include:
1. Present 3 of my favourite Photoshop works:
 |
| Figure 5: Plastic pollution. Photo source from: Pinterest |
As shown in this Photoshop artwork, a little boy lifts the blanket of ocean waves and sees many plastic bottles hiding under it. It depicts the fact that plastic pollution now continues affecting the marine environment, however people seem to ignore this plastic issue. I think this artwork is quite powerful in pointing out the irresponsible disposal of plastic waste and thus helping to raise environmental awareness among public.
 |
| Figure 6: Humorous Disney Characters. Photo source from: Pinterest |
Generally, Disney characters tend to be romantic and magical. This artwork seems to be simple, but it totally subverts my imagination by creating a down-to-earth surprise. The graphic designer challenges the traditional way and uses dark humour with the combination of pop-culture references.
 |
| Figure 7: Tipp-Kick Battle. Photo source from: Pinterest |
This is absolutely my most favourite Photoshop artwork. It is because the two characters are perfectly combined with the football stadium. The artwork details the way from the brightest highlights on the two characters' faces to the darkest shadows of their hands on the stadium. Do you usually have so many spectators watching when you play games? Therefore, I think the merging idea of football board game that is indeed a live football match playing in a stadium is really creative.
____________________________________________________________________________________________________________
____________________________________________________________________________________________________________
2. Sharing experience of playing Bezier game:
During my first semester, I have accessed the basic skills in visual communication design using Adobe Photoshop. Nevertheless, using pen tool is still a great challenge for me. I find the Bezier game is very useful in helping me master pen tool to trace the images from scratch. Based on the tutorial part in the game, I have learnt a new skill that holding down the ALT key can alter points or lines after drawing a curve line. For me, the most complex object to be traced is the letter 'S' as it contains a lot of continuously curved lines. However, I manage to trace it successfully after taking several tries. It takes me 10 nodes out of 12 available nodes to complete this level.
 |
| Figure 8: Bezier Game: Letter 'S'. |
In addition, I've faced difficulties while drawing this flag. Instead of giving up easily, I manage to use 16 nodes out of 17 nodes to trace it after many attempts. However, I'm unsatisfied with the outcome so I'll keep practising my pen tool skills by creating more new artwork.
 |
| Figure 9: Bezier Game: Flag. |
On the other side, there is a paper clip with many challenging curved lines. This time, I'm able to trace the object with 8 nodes out of 10 nodes which is also the ideal solution for this level. I'm truly glad to see my self-improvement on the pen tool's basic controls in such a short period of time.
 |
| Figure 10: Bezier Game: Paper Clip. |
Eventually, I have passed all levels with 10 nodes left. Oh yes, that is a winning feeling!
 |
| Figure 11: Bezier Game: Outcome. |
____________________________________________________________________________________________________________
3. Try the Hearst Mansion Exercise:
Mr. Martin encourages to try the Hearst Mansion Exercise 1 Part 1 by following his pre-recorded demo video.
 |
| Figure 12: Hearst Mansion. |
 |
| Figure 13: Shazam. |
 |
| Figure 14: Shazam after Quick Selection Tool.
As using the Quick Selection Tool part is the most challenging part for me, thus I will describe more about the successful process after many failed attempts. First, I choose the quick selection tool and then left-click on Shazam that I want to cut out. This creates a selection around the area that I have clicked. Next, click on other areas inside the object to add them to my selection. Then, hold down the "Alt" button which is a very useful keyboard shortcut for me and left-click on areas that I want to remove from the selection.
When everything is selected, there are two ways to cut out Shazam from the background.
Way 1:
Way 2:
After few experiments, I think way 2 suites me well as it is easy to be applied. I'm really satisfied with the learning outcomes.
|
 |
| Figure 15: Shazam after Resizing, Match Colour, and Saturation. Moving Shazam to Hearst Mansion:
Resizing:
Image>Adjustments>Match Color:
|
 |
| Figure 16: Adding Shazam's Shadow.
Adding Shadow:
|
 |
| Figure 17: Adding Shazam's Reflection.
Adding Reflection:
|
 |
| Figure 18: Final Outcome after Adjusting Reflection's Brightness/Contrast and Hue/Saturation. Reduce the Brightness of the reflection:
Making Blur:
Adjusting Hue/Saturation of the reflection:
After photoshopping Shazam into the Hearst Mansion (Exercise 1 Part 2), we are required to add our own photo to the same place and make it as realistic as possible.
|
 |
| Figure 19: My Photo before Editing. |
 |
| Figure 20: The First Outcome of Exercise 1 Part 2 after Photo Manipulation. |
I have encountered some difficulties while performing this task. Using quick selection tool is quite challenging for me as I have to select the image carefully without leaving any tiny holes. After that, Mr. Martin's video has accidentally skipped the part on how to inverse the selection and cut out the image. However, I manage to find solution on Google and thus dragging the new layer to the Hearst Mansion successfully.
In conclusion, Mr. Martin's tutorial video is pretty clear and easy to understand. I have mastered some basic Photoshop skills such as masking, free-transform and match colour by following a lists of step-to-step instructions instead of simply learning them by trial and error. I will improve my Photoshop skills by watching more tutorial videos and do more practice in the coming classes.
____________________________________________________________________________________________________________
Week 2 (20/04/20)
Today, Mr. Martin divides us into several smaller groups to track our progress on Hearst Mansion exercise which has assigned to us in the last week. During consultation, Mr. Martin is quite satisfied with my exercise 1 part 1 (Shazam in the Hearst Mansion).
1. Complete the Hearst Mansion Exercise 1 Part 2:
When it comes to Exercise 1 Part 2(photoshopping myself in the Hearst Mansion), he suggests me to retake my photo from a lower angle as the ratio of my original picture is distorted. However, he compliments me on my shadow effect and reflection. It gives me confidence to move forward and have more practice with Photoshop to continue making changes and completing the part 2 by this week.
____________________________________________________________________________________________________________
2. Mask Out Shazam with Pen Tool
Besides, we are also required to use pen tool to trace the outline of Shazam and cut it out. As compared to quick selection tool, I think using pen tool to cut out the object is more complex and time-consuming. Nevertheless, pen tool is better suited for more precise work. After that, the following steps are a bit different from using quick selection tool, thus I will make notes of them below.
1. Complete the Hearst Mansion Exercise 1 Part 2:
When it comes to Exercise 1 Part 2(photoshopping myself in the Hearst Mansion), he suggests me to retake my photo from a lower angle as the ratio of my original picture is distorted. However, he compliments me on my shadow effect and reflection. It gives me confidence to move forward and have more practice with Photoshop to continue making changes and completing the part 2 by this week.
 |
| Figure 21: Figure 19: My Photo before Editing. |
 |
| Figure 22: The Final Outcome of Exercise 1 Part 2 after Photo Manipulation. |
2. Mask Out Shazam with Pen Tool
Besides, we are also required to use pen tool to trace the outline of Shazam and cut it out. As compared to quick selection tool, I think using pen tool to cut out the object is more complex and time-consuming. Nevertheless, pen tool is better suited for more precise work. After that, the following steps are a bit different from using quick selection tool, thus I will make notes of them below.
 |
| Figure 23: Cut Out Shazam by Using Pen Tool. |
 |
| Figure 24: Left Click and Choose "Make Selection". |
 |
| Figure 25: Dotted Lines Represents The Selection Area. |
 |
| Figure 26: Add Vector Mask. |
 |
| Figure 27: Apply Layer Mask to Background Layer. |
 |
| Figure 28: Cut Out Shazam Successfully.
_____________________________________________________________________________________________________
3. Try the Ghost House Exercise 2 Part 1:
Mr. Martin encourages to try the Ghost House Exercise 2 Part 1 by following his pre-recorded demo video.
|
 |
Figure 29: House.
|
 |
| Figure 30: Dark Cloud. |
 |
Figure 31: Ghost Bride.
|
 |
| Figure 32: Quick Selection Tool.
In the exercise 1, we are taught to mask out an object by using quick selection tool. Therefore, Mr. Martin also uses the same method to mask out the house at first.
|
 |
Figure 33: Lasso Tool.
However, Mr. Martin demonstrates a new way to mask out the house by using Lasso Tool during Exercise 2 Part 1.
|
 |
| Figure 34: Delete Path in Lasso Tool.
Instead of clicking Command + Z, Mr. Martin teaches us to use 'Delete' key to return to the previous path when we accidentally make a mistake.
|
 |
| Figure 35: Masking. |
 |
| Figure 36: Select All to Move Ghost Bride. Moving Ghost Bride:
|
 |
Figure 37: Blending Mode (Multiply).
|
 |
| Figure 38: Blending Mode (Overplay). |
 |
Figure 39: Blending Mode (Screen).
|
Mr. Martin introduces us to 3 blending modes in the option bar which will be often used:
- Multiply (hide the white part)
- Overplay (hide the white and black part)
- Screen (hide the black part)
In this case, it is more suitable to apply blending mode (screen) to the ghost bride.
| Figure 40: Free Transform.
Free Transform the ghost bride to the house:
|
 |
Figure 41: Rectangle Marquee Tool.
Using Rectangle Marquee Tool:
|
 |
Figure 42: Crop Outside.
The part that is outside of the selection will be cut and delete.
|
 |
Figure 43: Use Gradient to Create Glowing Effects.
Adding Glowing Effects:
|
 |
Figure 44: Black Circle.
During this phase, I have faced a problem which the circle appears to be black instead of white. It is totally different from what Mr. Martin has shown as it is supposed to be a white circle.
|
| Figure 45: No Reverse in Radial Gradient. |
| Figure 46: Reverse. |
 |
| Figure 47: White Circle.
However, I manage to identify the problem which comes from the 'reverse' button. Based on the above issue, it is because I do not notice and tick the 'reverse' button in the task bar, resulting in the gradient color changes from black to white. After making change by ticking the button, the white glowing circle appears in reverse order. Thus, I have learnt to be more patient and dive in each step for more detail to to deal with the problem.
|
 |
| Figure 48: Blending Mode (Screen).
Blending mode:
|
 |
Figure 49: First Outcome of Ghost House Exercise 2 Part 1.
During Exercise 2 Part 1, I have gained a new skill which uses Lasso Tool to mask out an object. The blending modes in Photoshop have made me realise how pixels in an image are influenced by a painting or editing tool. Yet I have even learnt how to create glowing effects which can enhance the image, that really is the icing on the cake.
|
____________________________________________________________________________________________________________
Week 3 (27/04/20)
There are 27 blending modes in Adobe Photoshop. Today, Mr. Martin introduces us to 3 common types of blending modes which are multiply, screen and soft light. Mr. Martin also teaches us a shortcut to change blending modes by clicking Shift _ or +.
 |
| Figure 50: Example of Blending Mode "Multiple". |
- Select the birds with lasso tool
- Copy the selection
- Paste it on sea side image (new layer)
- Apply blending mode "multiply"
- Create new adjustment layer
- Apply level, create clipping mask by clicking "OPTION" key and then click on the layer
- Create new adjustment layer, apply gradient
- Apply blending mode "multiply"
- Adjust the opacity of the blending mode
 |
| Figure 51: Example of Blending Mode "Screen".
Screen:
|
 |
| Figure 52: Example of Blending Mode "Soft Light". |
Soft Light:
Mr. Martin gives us feedback on our Ghost House Exercise 2 Part 1 and he is quite satisfied with my outcome. In order to better improve my final outcome, I have also taken his advice by applying an extra adjustment layer to blend all visual elements with blending mode "subtract".
- Duplicate low contrast photo
- Apply blending mode "soft light" to increase contrast
- Create radial gradient in new level
- Apply blending mode "multiply"
Mr. Martin gives us feedback on our Ghost House Exercise 2 Part 1 and he is quite satisfied with my outcome. In order to better improve my final outcome, I have also taken his advice by applying an extra adjustment layer to blend all visual elements with blending mode "subtract".
 |
| Figure 53: Final Outcome of Ghost House Exercise 2 Part 1. |
____________________________________________________________________________________________________________
1. Complete Exercise 2 Part 2:
By applying the similar Photoshop skills that are used in Exercise 2 Part 1, Mr. Martin asks us to complete the exercise part 2.
 |
| Figure 54: Old House. |
 |
| Figure 55: Cowboy. |
 |
| Figure 56: Sunset. |
 |
| Figure 57: Cut out Old House and Move to Sunset Image. |
| Figure 58: Free Transform of Old House.
Then, I match the old house colour with the sunset background.
|
 |
| Figure 59: Cut out Cowboy by using Quick Selection Tool.
For me, the most challenging part in this exercise is to select the cowboy's rope carefully without leaving any tiny holes while applying quick selection tool. After that, drag the layer to the sunset image as well.
|
 |
| Figure 60: Final Outcome of Exercise 2 Part 2. |
____________________________________________________________________________________________________________
2. Try Recolouring Exercise 3 Part 1:
Mr. Martin encourages to try the Recolouring Exercise 3 Part 1 by following his pre-recorded demo video.
 |
| Figure 61: Portrait - Norman Lindsay. |
 |
| Figure 62: Select Colour. |
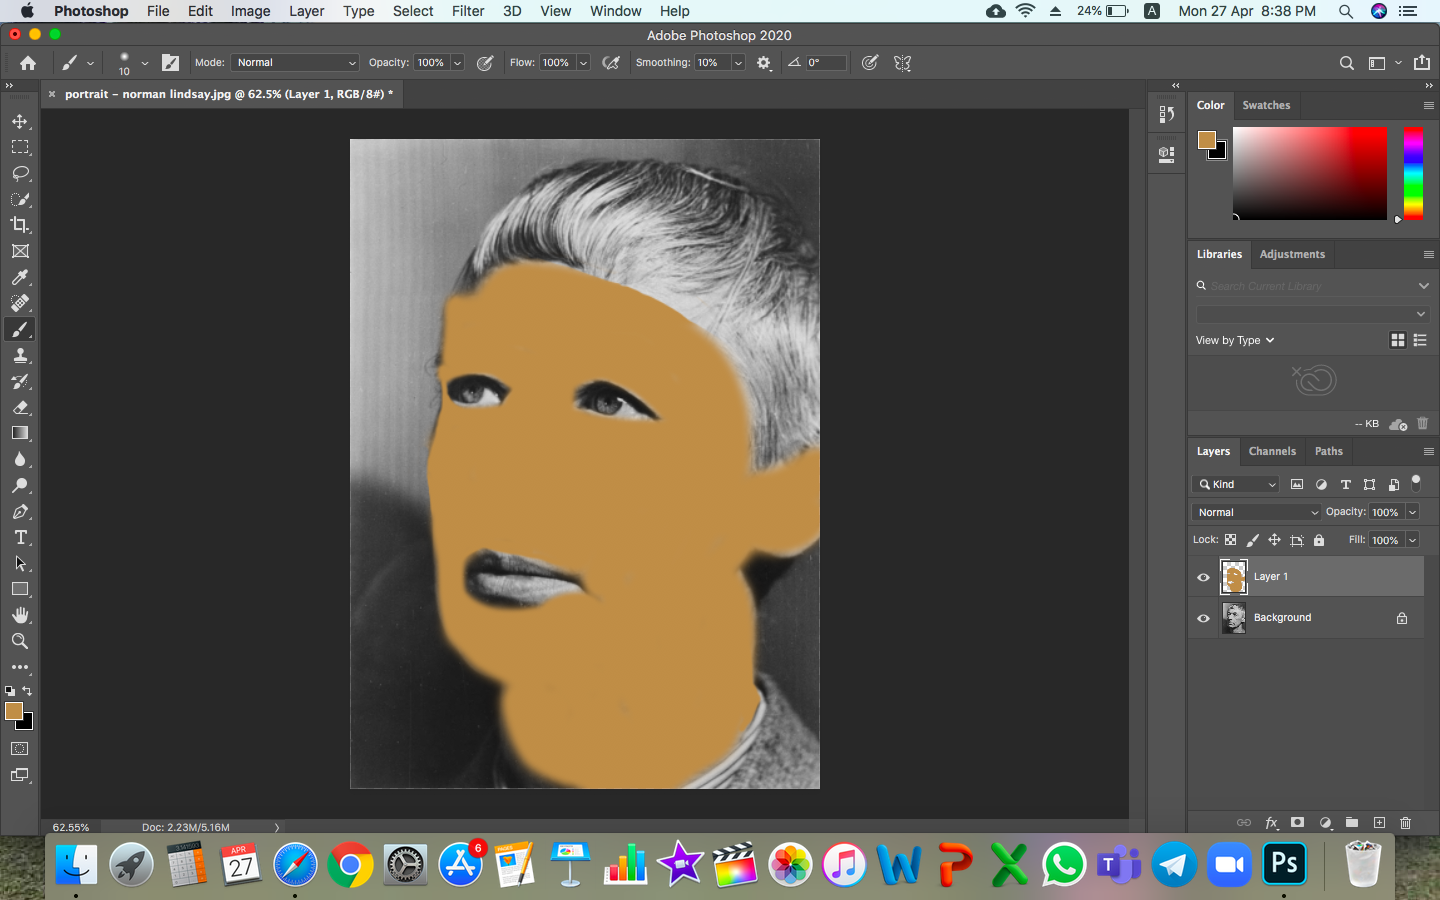 |
| Figure 63: Brush Tool (Face).
Apply Brush Tool (Command + B):
|
 |
| Figure 64: Blending Mode "Overlay". Blending Mode "Overlay":
|
 |
| Figure 65: Quick Selection Tool.
Blending Mode "Soft Light":
|
 |
| Figure 66: Final Outcome of Exercise 3 Part 1. |
I am truly glad that I have learnt to recolour portrait during Exercise 3 Part 1. Next time, I can restore the old images to bring back those old photos as well as experience the pleasing memories with the application of Photoshop's healing brush, blending modes and so on.
____________________________________________________________________________________________________________
Week 4 (04/05/20)
Today, Mr. Martin introduces us to the use of layer mask and brush tool in Photoshop coupled with a class exercise. In layer mask, black is to hide while white is to show.
Recolouring:
During this recolouring exercise, I have encountered some difficulties in the learning process such as how to add solid colour and hue/saturation to the layer. However, I have learnt from Mr. Martin to right click the needed layer and select "create new fill or adjustment layer" in the layer bar below to fix my problem. After completing the hair part, I apply the same method for the others part and recolour the entire image successfully. I find this exercise is quite interesting as I can recolour the image with brush tool in different colours, create various layers and blend them with different modes. Indeed, my Photoshop skills have been improved by accomplishing these given tasks.
____________________________________________________________________________________________________________
Today, Mr. Martin introduces us to the use of layer mask and brush tool in Photoshop coupled with a class exercise. In layer mask, black is to hide while white is to show.
 |
| Figure 67: Original Photo. |
 |
| Figure 68: Recolouring Class Exercise. |
- Select skin colour and hair colour from references by using eyedropper (5 by 5 average)
- Duplicate background layer
- Add vector mask
- Then click on the new layer to inverse (Command + I)
- Choose "white" brush tool
- Start masking the hair
- Command + Click the layer to see hair selection
- Select>Deselect the selection
- Properties>Select and Mask
- Add Solid Colour
- Apply Hue/Saturation (Remember to click "colourise")
- Apply Vibrance
- Play with blend modes and opacity as well
____________________________________________________________________________________________________________
1. Complete Recolouring Exercise 3 Part 2:
 |
| Figure 69: White Man BEFORE Recolouring. |
 |
| Figure 70: White Man AFTER Recolouring. |
 |
| Figure 71: Black Woman BEFORE Recolouring. |
 |
| Figure 72: Black Woman AFTER Recolouring. |
During this recolouring exercise, I have encountered some difficulties in the learning process such as how to add solid colour and hue/saturation to the layer. However, I have learnt from Mr. Martin to right click the needed layer and select "create new fill or adjustment layer" in the layer bar below to fix my problem. After completing the hair part, I apply the same method for the others part and recolour the entire image successfully. I find this exercise is quite interesting as I can recolour the image with brush tool in different colours, create various layers and blend them with different modes. Indeed, my Photoshop skills have been improved by accomplishing these given tasks.
____________________________________________________________________________________________________________
2. Try Displacement Map Exercise 4 Part 1:
Mr. Martin encourages to try the Displacement Map Exercise 4 Part 1 by following his pre-recorded demo video. There are 2 parts of demo in this exercise.
Part 1 Demo
In Exercise 4 Part 1, I have learnt to get creative with displacement map in Photoshop by using the tool at Filter>Distort>Displace. This displacement map is then used to apply a texture to a flat graphic via the Displace filter, and it distorts the graphic to conform to the shape of the map. This gives the flat graphic, or 2D object such as logos or text, a more realistic 3D look. I think implementing a displacement map is not as daunting as it might appear. Yet I can map a texture onto someone’s face or a logo contoured onto a textured surface with the application of Photoshop's distortion, Gaussian Blur, healing brush and so on in the coming future.
Week 5 (11/05/20)
Due to public holiday, we are required to complete Displacement Map Exercise 4 Part 2 by watching a demo video for this week.
1. Complete Displacement Map Exercise 4 Part 2:
Following the pre-recorded demo video, Mr. Martin encourages us to create hybrid animal with displacement map. We are required to select a photo of animal online, as well as a photo of fur/skin from different animal (but avoid using birds as feathers don't work well with displacement map), then apply the new coat to the chosen animal.
Mr. Martin encourages to try the Displacement Map Exercise 4 Part 1 by following his pre-recorded demo video. There are 2 parts of demo in this exercise.
Part 1 Demo
 |
| Figure 73: Fabric. |
 |
| Figure 74: Malaysia Flag. |
 |
| Figure 75: Fabric in Black and White.
Preparation for Displacement (Fabric.jpg):
|
 |
| Figure 76: Malaysia Flag Displacement Map.
Part 2 Demo
|
 |
| Figure 77: CEO Portrait. |
 |
| Figure 78: Liverpool. |
 |
| Figure 79: Portrait in Black and White. |
Preparation for Displacement (Portrait.jpg):
- Image>Adjustments>Black and White
- Filter>Blur>Gaussian Blur
- Save as ".photoshop" (Liverpool Displacement Map)
- Move flag layer to the original portrait jpg
- Bring down the opacity
- Free transform to the center of face
- Turn up the opacity
- Filter>Convert for Smart Filters
- Filter>Distort>Pinch (-40%)
- Filter>Distort>Displace
- Choose Liverpool Displacement Map.psd
- Choose "Multiply"
- Add Vector Mask
- Choose Black colour, use Brush Tool
- Adjust flow to 13% to smooth the edge of hair
- Bring back flow to 100%
- Brush on the eyes and lip to remove the flag mark
- Use Blur Tool to soften around the edge of face
- If too much, switch to White colour and use brush tool to brush the edge of face again
- Duplicate portrait layer
- Named first as "Multiply"
- Named second as "Screen"
- Bring down opacity
- Then select on screen layer, choose Black colour to brush out the eye brow
 |
| Figure 80: Liverpool Portrait Displacement Map. |
- Move Malaysia Flag to portrait
- Rotate 90 degrees
- Bring down opacity of flag to adjust the position of flag on face
- Turn up opacity
- Right Click and Choose "Convert to Smart Object"
- Filter>Distort>Pinch (-40%)
- Filter>Distort>Displace
- Choose Liverpool Displacement Map.psd
- Choose "Multiply"
- Drag one portrait layer to flag layer directly
- Click on that portrait layer in flag layer and use brush tool to clear the area around face
- Duplicate Malaysia flag layer
- Named first as "Multiply"
- Named second as "Screen"
- Bring down both opacity of layers
 |
| Figure 81: Malaysia Portrait Displacement Map. |
____________________________________________________________________________________________________________
Week 5 (11/05/20)
Due to public holiday, we are required to complete Displacement Map Exercise 4 Part 2 by watching a demo video for this week.
1. Complete Displacement Map Exercise 4 Part 2:
Following the pre-recorded demo video, Mr. Martin encourages us to create hybrid animal with displacement map. We are required to select a photo of animal online, as well as a photo of fur/skin from different animal (but avoid using birds as feathers don't work well with displacement map), then apply the new coat to the chosen animal.
 |
| Figure 82: Original Cat. |
 |
| Figure 83: Giraffe Skin. |
 |
| Figure 84: Cat Displacement Map. |
 |
Figure 85: Original Elephant. |
 |
| Figure 87: Elephant Displacement Map. |
Every steps of the application of displacement map include:
Animal Photo:
Fur/Skin Photo:
Animal Photo:
- Apply black & white filter
- Apply Gaussian blur
- Save as displacement map PSD file
- Reopen the jpeg/png photo (NOT the PSD file)
Fur/Skin Photo:
- Move it to the animal photo
- Free transform to resize & rotate
- Convert to smart object
- Apply displacement map
- Choose blending mode
- Masking
Change Background Colour:
- Choose the background layer
- Select Quick Selection Tool
- Hide Displacement Layer
- Select some part of subject, and choose "Select Subject" on the top
- Then, the whole subject will be selected
- Zoom in to improve some unselected part
- Apply the Mask
- Clicking "Option" Key and drag the new layer to the displacement layer (duplicate the mask)
- Use Quick Selection Tool and Brush Tool to mask out the animal eyes and nose
- Add new layer for a new background, rename and place it at the bottom
- Edit>Fill>Color
- Add Radial Gradient
In my opinion, one of the biggest challenges of this exercise is to find a good combination of fur/skin to the chosen animal. As sometimes it does not work well, thus we have to learn through trial and error to apply the most suitable and perfect fur/skin to the animal. Nevertheless, I feel creative when accomplishing this exercise as it allows me to more realistically put a texture or pattern onto a surface.
Overview
https://stellahuiyee.blogspot.com/2020/07/blog-post_12.html
Project 1 (Week 1-5)
https://stellahuiyee.blogspot.com/2020/04/digital-photography-and-imaging.html
Lecture and Tutorial (Week 1-6)
https://stellahuiyee.blogspot.com/2020/04/digital-photography-and-imaging-lecture_28.html
Project 2 (Part A: Week 6-8 / Part B: Week 6-10)
https://stellahuiyee.blogspot.com/2020/05/digital-photography-and-imaging-2-koh.html
Project 4 (Week 9-14)
https://stellahuiyee.blogspot.com/2020/06/project-4-as-you-can-see-claw-is.html
Practical (Week 11-14)
https://stellahuiyee.blogspot.com/2020/06/blog-post.html


评论
发表评论