DIGITAL PHOTOGRAPHY AND IMAGING - PRACTICAL (week 11-14)

Bachelor of Mass Communication
Digital Photography and Imaging
Notes and Exercises
____________________________________________________________________________________________________________
Week 11 (22/06/20)
Today, Mr. Martin demonstrates us how to adjust some raw images in Photoshop.
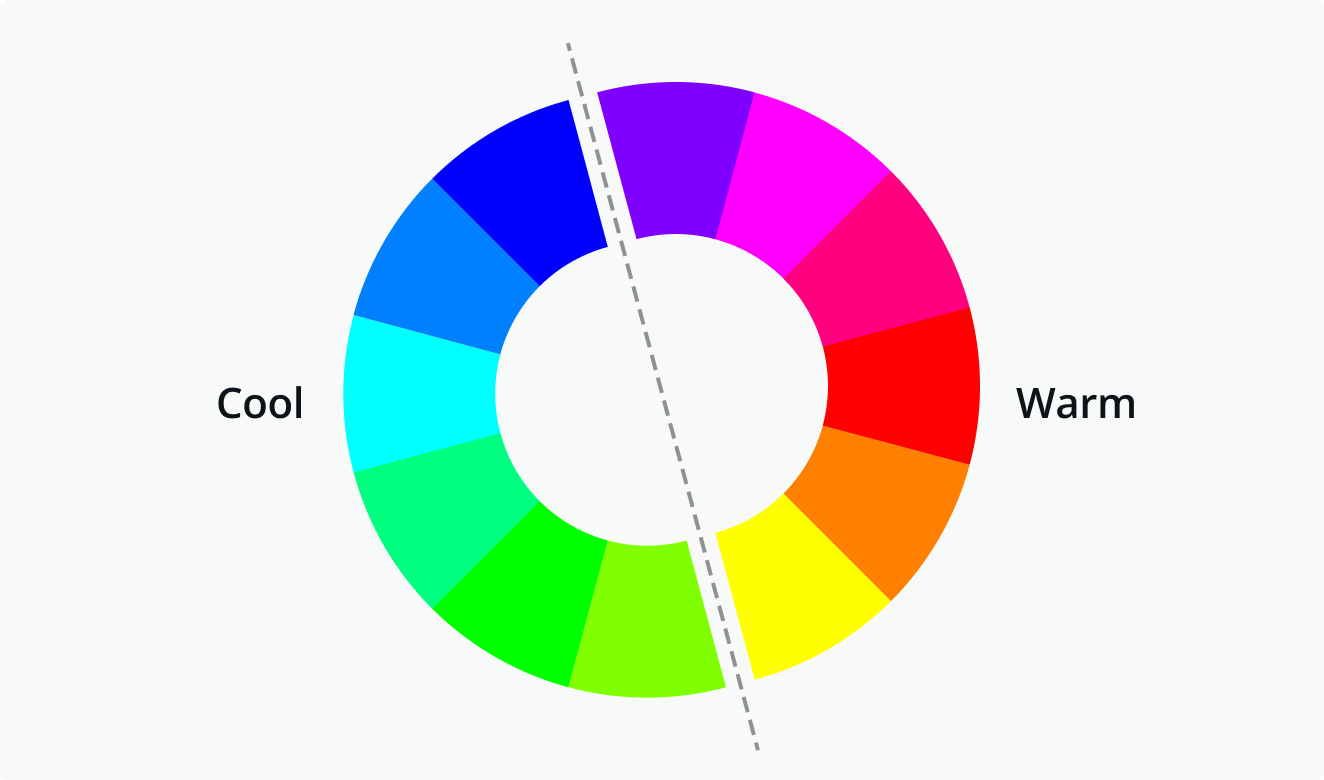 |
| Figure 1: Colour Wheel. |
First, he shows us an RGB colour wheel which is designed for online use as it refers to mixing light. The complementary colour combination are two colours that are on opposite sides of the colour wheel. This combination provides a high contrast and high impact colour combination. Besides, the colour wheel can be divided into warm and cool colours. The warmth or coolness of a color is also known as its color temperature. According to color psychology, different color temperatures can evoke different feelings. Warm colours are the colours from red through to yellow. While cool colours are the colours from blue to green and purple.
There are some tips while adjusting the raw images. The left side means dark while the right side means bright as shown in an histogram in Photoshop. Furthermore, the value of adjustments can be reset when we double click on the slider. By clicking the "option" key while adjusting can temporarily get rid of the colour on the image. Moreover, I have also understood the terms of underexposure and overexposure. An underexposure image is the kind of photograph that one might consider to be too dark. An image that is brighter than it should be can be considered as overexposure.
Then, we are assigned to make adjustments on a few given images. These are the comparison of the original raw photos with my adjustment outcomes.
 |
| Figure 2: Raw Image 1. |
 |
| Figure 3: Raw Image 1 AFTER Adjustments. |
 | ||
Figure 4: Raw Image 2.
|

 |
| Figure 6: Raw Image 3. |
 |
| Figure 7: Raw Image 3 AFTER Adjustments. |
 |
| Figure 8: Raw Image 4. |
 |
| Figure 9: Raw Image 4 AFTER Adjustments. |
During this lesson, I have learnt to improve image quality by adjusting its colour temperature, brightness, contrast, shadow, clarity, vibrance, saturation, toning and so on.
____________________________________________________________________________________________________________
Week 12 (29/06/20)
It is an interesting week as today Mr. Martin teaches us to first make adjustments on both the subject and background layers in Photoshop. Then, we can export them as a short 5 secs video or GIF.
Steps to make video:
- Select and mask out the subject
- Load selection (Command + Click)
- Select>Modify>Expand by 5 pixels
- Select the original background layer
- Edit>Fill>Content-aware
- Deselect
- Layer>Smart Objects>Convert to Smart Object for both layers
- Window>Timeline
- Click on "create video timeline"
- Make keyframes and free transform the layers
- File>Export>Render Video (H.264)
Steps to make GIF:
- Select and mask out the subject
- Load selection
- Select>Modify>Expand by 5 pixels
- Select the original background layer
- Edit>Fill>Content-aware
- Deselect
- Layer>Smart Objects>Convert to Smart Object for both layers
- Duplicate one more subject layer and rename them
- Window>Timeline
- Click on "create video timeline"
- Click the menu icon from the upper right corner of the timeline panel
- Convert Frames>Convert to Frame Animation
- Adjust time to 0.5 secs
- Duplicate the first frame
- Turn off the visibility of first layer
- Select on the second layer, Edit>Puppet Wrap
- Make points at joints and adjust them
- Export>Save for Web (Legacy) (Make it Loop "forever")
 |
| Figure 10: Yowa. |
Video 1: Yowa.
 |
| Figure 11: Surfing Boy. |
Video 2: Surfing Boy.
 |
| Figure 12: Yowa. |
Video 3: Yowa.
 |
| Figure 13: Yoga. |
 |
| Figure 14: GIF of Yoga. |
 |
| Figure 15: Levitation. |
 |
| Figure 16: GIF of Levitation. |
____________________________________________________________________________________________________________
Week 13 (06/07/20)
This week, we are allowed to do a studio lighting practice on campus. However, I choose not to attend the practice due to my health and safety concern. Therefore, I have watched the uploaded video to catch up on the lesson.
I have observed that Mr. Martin and my course mates work together to set up the studio lighting in the first half hour of video. Indeed, light is of utmost significance in photography. Without light, there is no proper photograph. As shown in the video, the key light can be better described as a main source of light on a set. The purpose of the key light is to highlight the form and dimension of the subject. Yet the key light should light the subject’s face, so it may need to be repositioned throughout a shoot depending on a desired pose.
Besides, I have noticed that fill light also comes into play during photo shooting. A fill light is used to fill in shadows caused by other lights (mainly a key light), but without creating harsh shadows of its own. For this reason, fill light should always be diffused. In addition, rim light can also be seen in the recorded video. The rim light, also known as the back light or kicker, is a light source placed behind the subject to cast light to help separate the subject from the background.
 |
| Figure 17: Three Point Lighting. |
In a nutshell, the studio lighting can be considered as a fun process to explore. During this lesson, I have learnt how to take a good photography with the assistance of different lighting in studio. Also, different lighting positions and different camera angles will also have an impact on the photograph. Thus, I will try to find more inspiration and other creative lighting ideas to work into my shoot in the process of building each light into my set in the future.
____________________________________________________________________________________________________________
Overview
https://stellahuiyee.blogspot.com/2020/07/blog-post_12.html
Project 1 (Week 1-5)
https://stellahuiyee.blogspot.com/2020/04/digital-photography-and-imaging.html
Lecture and Tutorial (Week 1-6)
https://stellahuiyee.blogspot.com/2020/04/digital-photography-and-imaging-lecture_28.html
Project 2 (Part A: Week 6-8 / Part B: Week 6-10)
https://stellahuiyee.blogspot.com/2020/05/digital-photography-and-imaging-2-koh.html
Project 4 (Week 9-14)
https://stellahuiyee.blogspot.com/2020/06/project-4-as-you-can-see-claw-is.html
Practical (Week 11-14)
https://stellahuiyee.blogspot.com/2020/06/blog-post.html
____________________________________________________________________________________________________________
Week 14 (13/07/20)
During the last practical lesson, Mr. Martin teaches us to apply the lighting effects in Adobe Photoshop to some studio photos. Indeed, the lighting effects can not only improve the lighting of photos, but also enhance the visual by adding the lens flare in them.
 |
| Figure 18: Original Studio Photo 1. |
 |
| Figure 19: Photo AFTER Adding Lighting Effects and Lens Flare. |
 |
| Figure 20: Original Studio Photo 2. |
 |
| Figure 21: Photo AFTER Adding Lighting Effects and Lens Flare. |
Steps to apply lighting effects and lens flare:
- Open the images
- Duplicate the background layer
- Apply Levels to make the subject to be more visible
- Use Quick Selection Tool to mask out the subject
- Use Brush to mask out the remaining part which hasn't been selected from the previous subject
- Duplicate the background layer
- Convert it to smart object
- Filter>Render>Lighting Effects to apply lighting effects
- Adjust the point light
- Colourise is used to adjust the light exposure outside the hotspot, while colour is used to adjust it inside the hotspot
- Gloss is used to adjust the amount of reflective light that you want
- Metallic is applied to have more light effect outside the hotspot
- Duplicate the background layer
- Convert it to smart object
- Filter>Render>Lighting Effects to apply lighting effects
- Adjust the infinite light
- Duplicate the background layer
- Convert it to smart object
- Filter>Render>Lighting Effects to apply lighting effects
- Adjust the spot light
- Apply Levels to enhance the shadows of images
- Drag the mask layer to the top and inverse the layer
- Duplicate a new layer from it, apply the blending mode "Screen"
- Apply Filter>Render>Lens Flare
- Apply Hue and Saturation to change the colour of lens flare
For the second photo,
- Apply Gradient and can also change the colours
All in all, my digital media skills have been improved during the lessons from April to July 2020. I truly appreciate Mr. Martin's time and effort in teaching us the Photoshop skills including masking, layering, match lighting, recolouring, displacing map, lighting effects and so on. Also, it is hoped that I can come up with more interesting designs with the useful Photoshop skills in the future.
https://stellahuiyee.blogspot.com/2020/07/blog-post_12.html
Project 1 (Week 1-5)
https://stellahuiyee.blogspot.com/2020/04/digital-photography-and-imaging.html
Lecture and Tutorial (Week 1-6)
https://stellahuiyee.blogspot.com/2020/04/digital-photography-and-imaging-lecture_28.html
Project 2 (Part A: Week 6-8 / Part B: Week 6-10)
https://stellahuiyee.blogspot.com/2020/05/digital-photography-and-imaging-2-koh.html
Project 4 (Week 9-14)
https://stellahuiyee.blogspot.com/2020/06/project-4-as-you-can-see-claw-is.html
Practical (Week 11-14)
https://stellahuiyee.blogspot.com/2020/06/blog-post.html


评论
发表评论